GitHub Link: https://github.com/nishafnaeem/n8n-website-analyzer
In today’s fast-paced world, one of the biggest challenges for businesses and individuals is connecting different apps and automating repetitive tasks. This is where tools like n8n (an open-source workflow automation platform) come in. Think of it as a bridge for your data—it lets you link various services, APIs, and databases together to create powerful, automated workflows without needing to write complex code. The demand for these platforms is growing rapidly because they empower people to build solutions that save time, reduce manual errors, and free up energy for more creative work.
I started using n8n for this very reason. I was fascinated by the idea of creating smart automations and wanted to explore how I could apply it to real-world problems. That’s why I embarked on a personal learning project to automate lead qualification. As I’ve seen more and more companies use AI for lead validation, I wanted to understand the process and build my own solution. The idea was to create a workflow that could take a list of company website domains and automatically vet each one. While n8n is an amazing tool out of the box, this learning exercise required me to get my hands dirty with some custom work. This document is all about the two biggest challenges I faced and how I solved them. 🛠️
The Docker Challenge: Building a Custom n8n Image Link to heading
The first major hurdle was getting the right tools to work inside the n8n environment. My workflow needed to handle JavaScript-heavy websites, so I needed Playwright, a powerful web automation library. My initial thought was to simply install it on a standard n8n Docker image. Easy, right?
Not quite. I ran into a bunch of issues, including compatibility problems with the specific Linux architecture used in the official n8n images. I kept getting errors like this:
“The issue is that Playwright doesn’t have pre-built wheels for the specific Alpine Linux architecture or Python 3.12 combination in the n8n image. Let me try a different approach by using an alternative web automation library or building from source.”
It became clear that I couldn’t just install Playwright in the existing environment. My solution was to build my own custom Docker image. I started with the python3.13-slim-bookworm base image, which is a bit more flexible. From there, I manually installed Node.js, n8n, and all the required Python libraries, including Playwright. This gave me a self-contained, custom environment that had everything I needed to run my workflow without any dependency conflicts.
Once the image was ready, I used a docker-compose file to run it. This also let me mount my local project directory into the container, so I could edit my workflow files without losing any changes. Running n8n locally this way made development and testing so much easier.
The Python Conundrum: When a Code Node Isn’t Enough Link to heading
With the custom Docker image, I figured the rest would be smooth sailing. I was ready to write my Python script to handle the Playwright scraping. Naturally, I tried to use n8n’s built-in Python Code node. I imported the Playwright library, wrote my code, and ran it.
It failed.
I was completely stuck. I had confirmed that the libraries were installed correctly inside the container, but the Code node just couldn’t access them. After a lot of digging, I discovered a crucial detail that explained everything: the n8n Code node uses a special environment called Pyodide, and that’s where the limitations come from.
Here’s why I had to use the Execute Command node instead:
The Problem with the Code Node (Pyodide Environment) 🚫 Link to heading
The Code node runs Python in a secure, sandboxed browser environment, not on a traditional operating system. This meant it had significant constraints that made it incompatible with a powerful library like Playwright:
- No Access to
pip: The standardpipcommand is unavailable within Pyodide. It relies on a different package manager,micropip, which can only install a limited set of packages specifically pre-compiled for WebAssembly. - No Native Dependencies: This environment cannot install packages with native dependencies, which is exactly what Playwright and other libraries like
lxmlrequire to function. - No System-Level Tools: The sandboxed environment lacks a conventional file system and crucial build tools like C compilers.
The Solution with the Execute Command Node Link to heading
The Execute Command node completely bypasses this issue because it runs bash commands directly inside the Docker container’s full operating system. This gave me the flexibility I needed:
- Full System Access: I had a complete Python installation with
pipand access to all the system packages and libraries I had installed in my custom Dockerfile. - Library Compatibility: I could run my Python script with full access to Playwright’s browser binaries and drivers.
- File System Access: The node has complete file system access, which is essential for more complex scripts.
This was the breakthrough that made the Playwright fallback possible. By simply swapping out the node, I was able to turn a frustrating technical roadblock into a solid solution. 💡
The Final Workflow: How It All Fits Together Link to heading
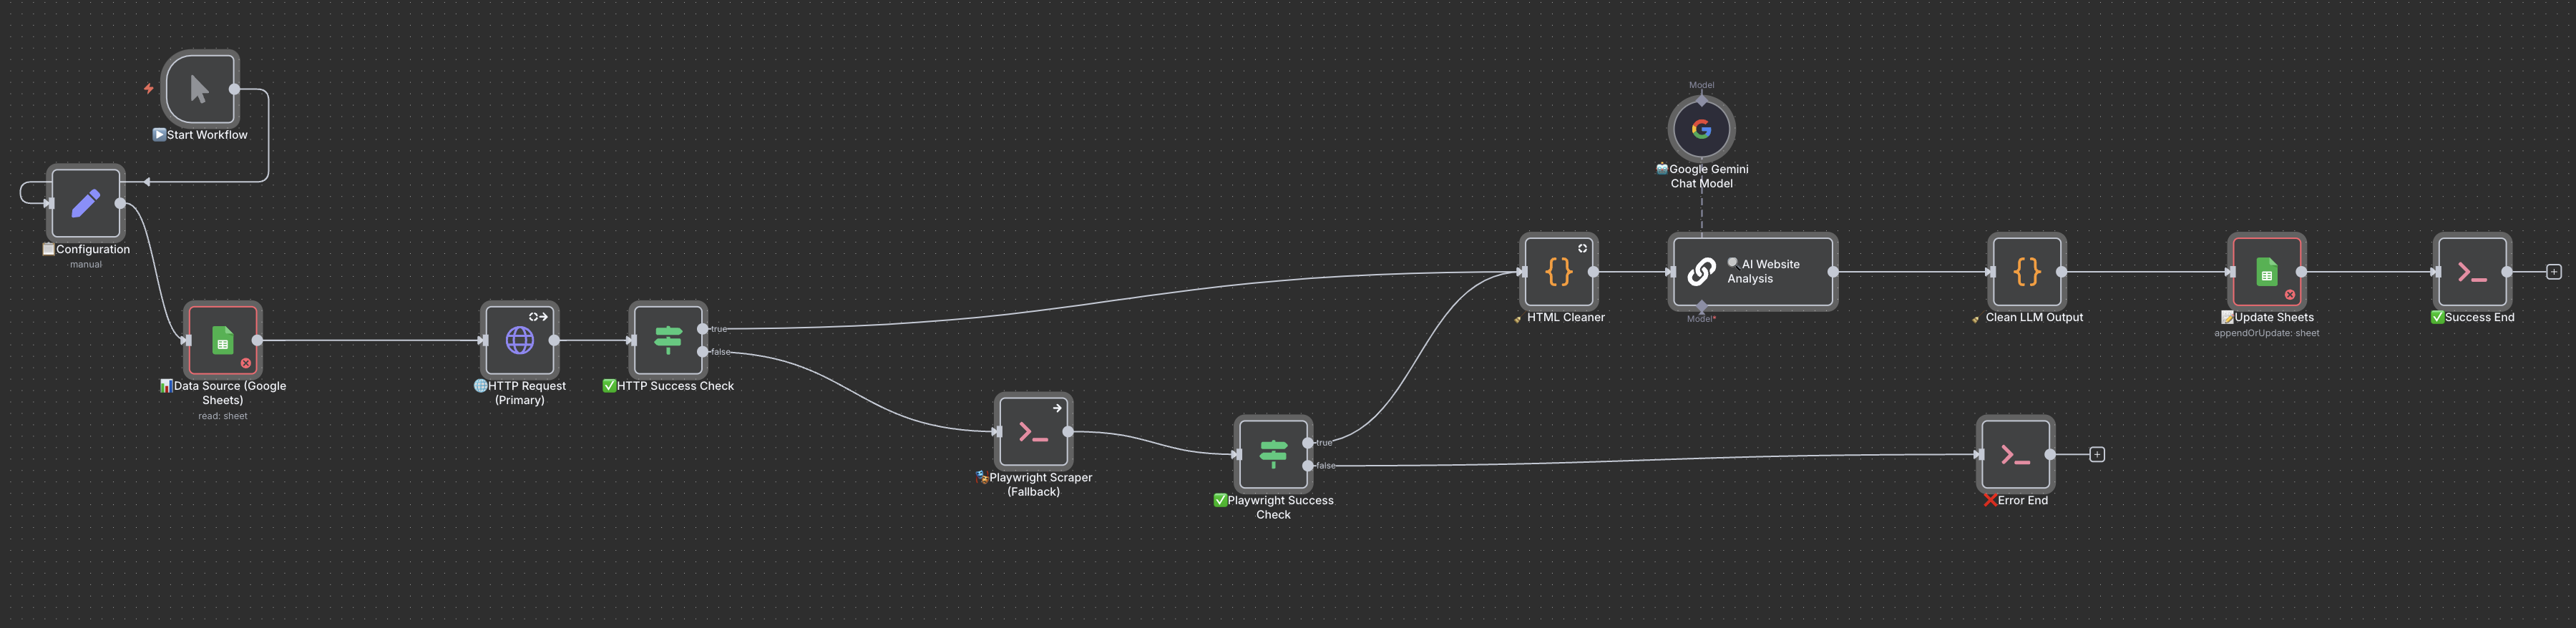 Here’s a high-level overview of how the completed workflow operates:
- Start: The workflow kicks off, pulling a list of company URLs from a Google Sheet.
- Primary HTTP Request: The workflow first tries to fetch the website content using a standard HTTP request. This is the fastest method and works for most simple websites.
- Fallback to Playwright: If the HTTP request fails (often due to dynamic content or aggressive blocking), the workflow automatically switches to the Playwright scraper. It uses the custom Python script I created to render the page and scrape the content as a user would see it.
- AI Analysis: The scraped HTML content is sent to an AI model (like Gemini) with a detailed prompt. This is where the magic happens. The AI analyzes the content and extracts key data points like contact information, business type, and whether the site sells products.
- Lead Qualification: The AI’s analysis is then used to determine the final lead status (e.g., “Lift Prime,” “Unqualified — Junk Lead”). This part of the workflow uses a series of checks to make a smart, automated decision.
- Update Sheets: Finally, all the extracted data and the final lead status are written back to the Google Sheet, giving us a clean, validated list of leads.
By overcoming those initial Docker and Python challenges, I was able to build a robust and highly effective automation as a personal learning exercise.
See the Workflow in Action 🎬 Link to heading